Python Scripting: From Transcript to Animation in TouchDesigner
published Jul 28, 2025
//last updated Aug 29, 2025
Python
TouchDesigner
Introduction
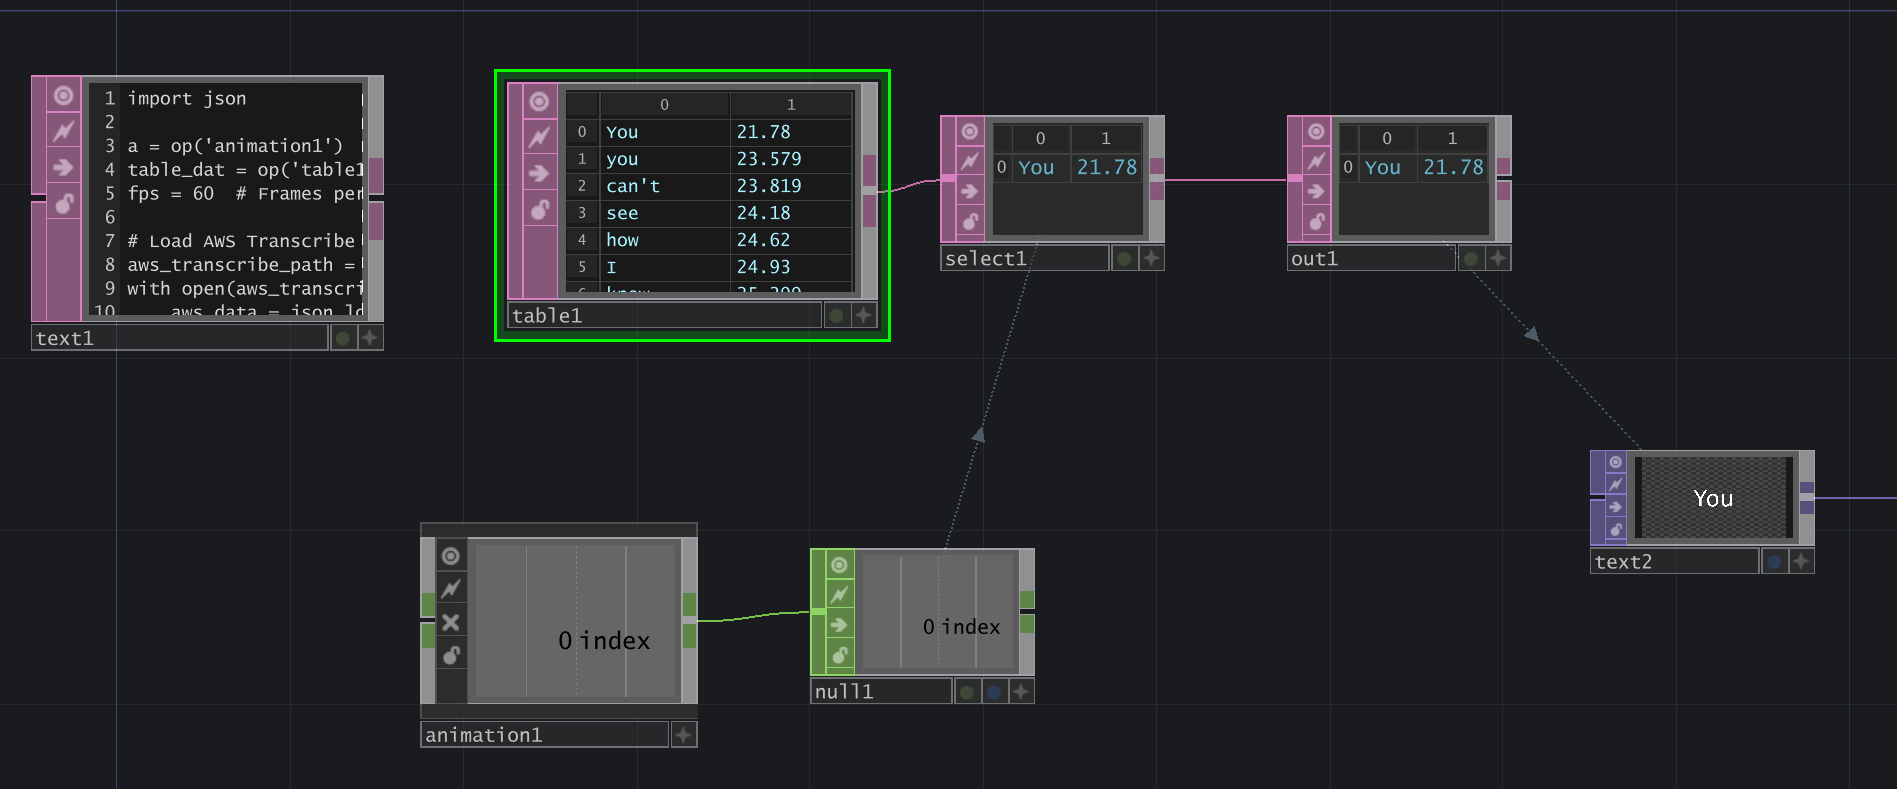
As part of a larger project to automate the creation of lyric videos in TouchDesigner, I have been exploring different ways to import a transcript and automate the animation keyframing process. Below is my basic setup for lyric selection & animation in TouchDesigner.
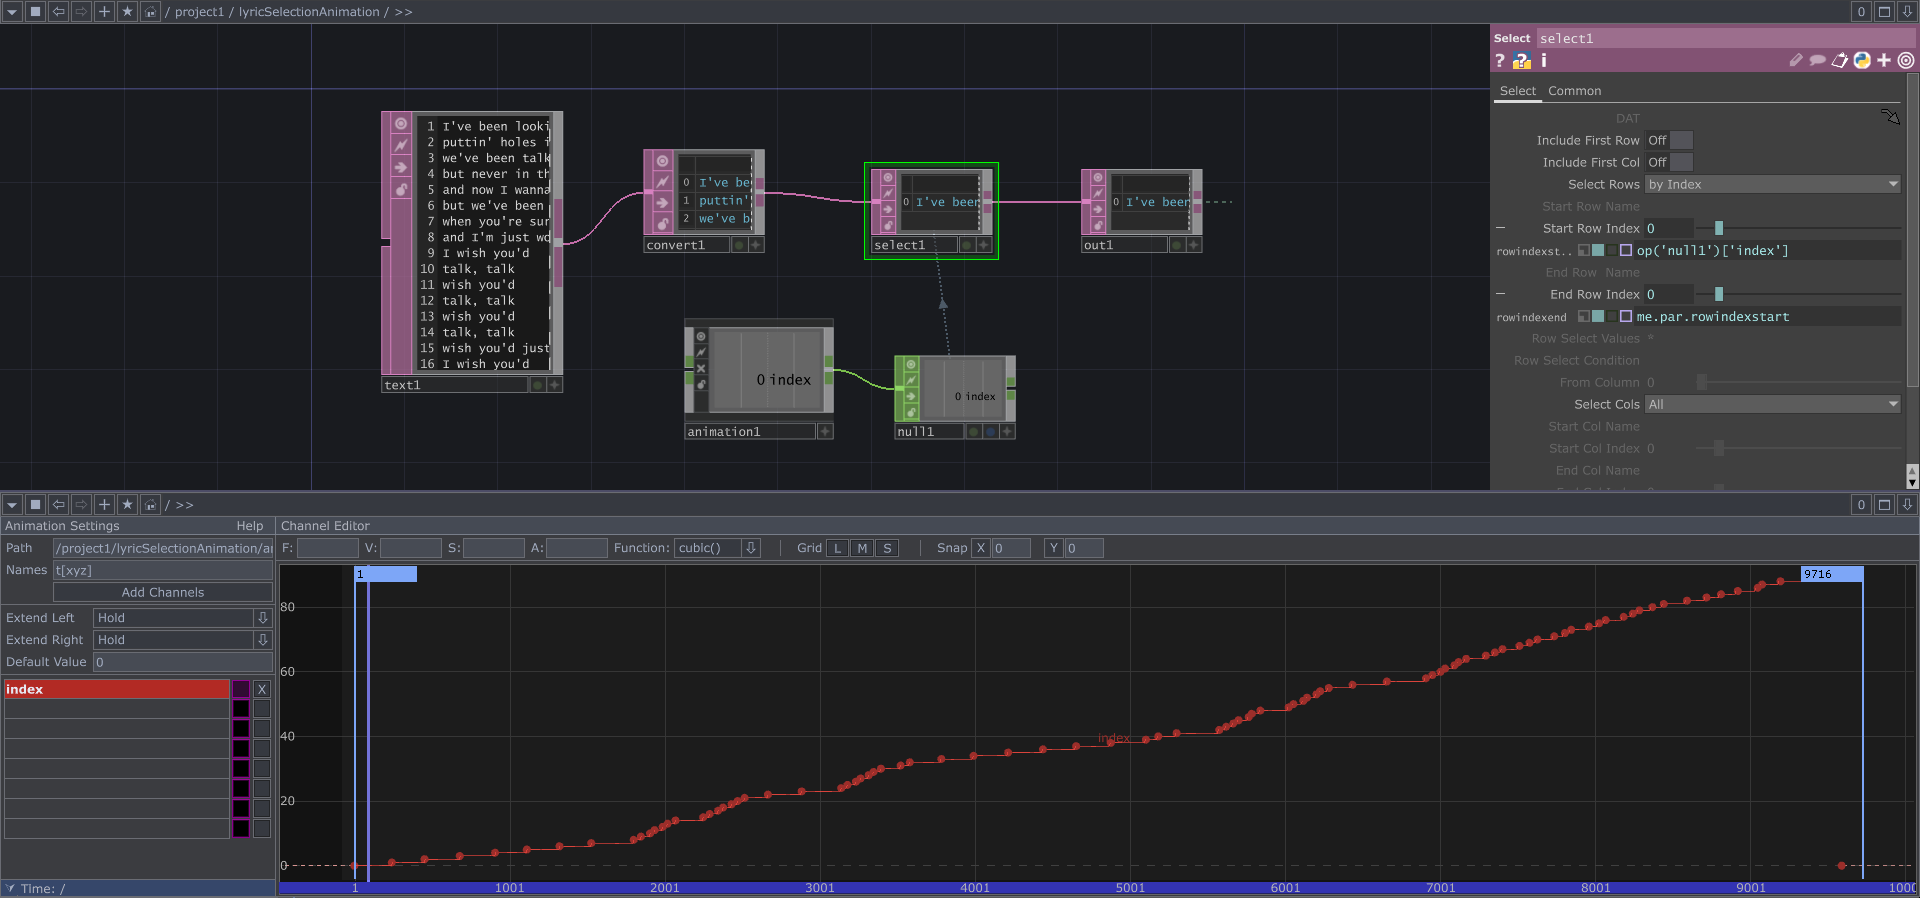
Let’s break down this network:
- text1 DAT: This holds the lyrics that will be displayed on the screen, one line at a time.
- convert1 DAT: Convert the text to a table.
- select1 DAT: Select rows by index. Start Row Index is set to the value of the ‘index’ channel, which pulls from a null connected to an animation COMP. End Row Index is set to me.par.rowindexstart, meaning the Start and End Row Index will always be equal, so only one row is selected at a time.
- animation COMP: This holds a channel called “index”, which has keyframes for each time the select1 DAT should select the next row in the lyrics table. The function between each point should be constant() so the switching is instantaneous.
- null CHOP: This holds the “index” channel information from the animation COMP.
- out1 DAT: This example was contained within a base COMP, so the out DAT provides the selected text as output to be used for a visual.
- (To pull the output into a text TOP, attach a null DAT to the base COMP, then create a text TOP and set its Text parameter to op(‘null1’)[0,0].)
This setup is based on the second technique described in “How To Make a Lyric Video” by Bileam Tschepe (elekktronaut).
Unpacking the Animation COMP
Upon my first review of the documentation for the Animation COMP Python Class, I noticed that it only has two methods (besides those inherited from its parent classes): setKeyframe and deleteKeyframe. While this allows us to create add & remove keyframes to an existing channel, we have no way to create and delete channels. However, more options became apparent after I inspected the internal network of an animation COMP (via “zooming” in with the middle mouse button or double-clicking the component). Below are the internal components of the aforementioned animation COMP, with the channels and keys tables expanded.
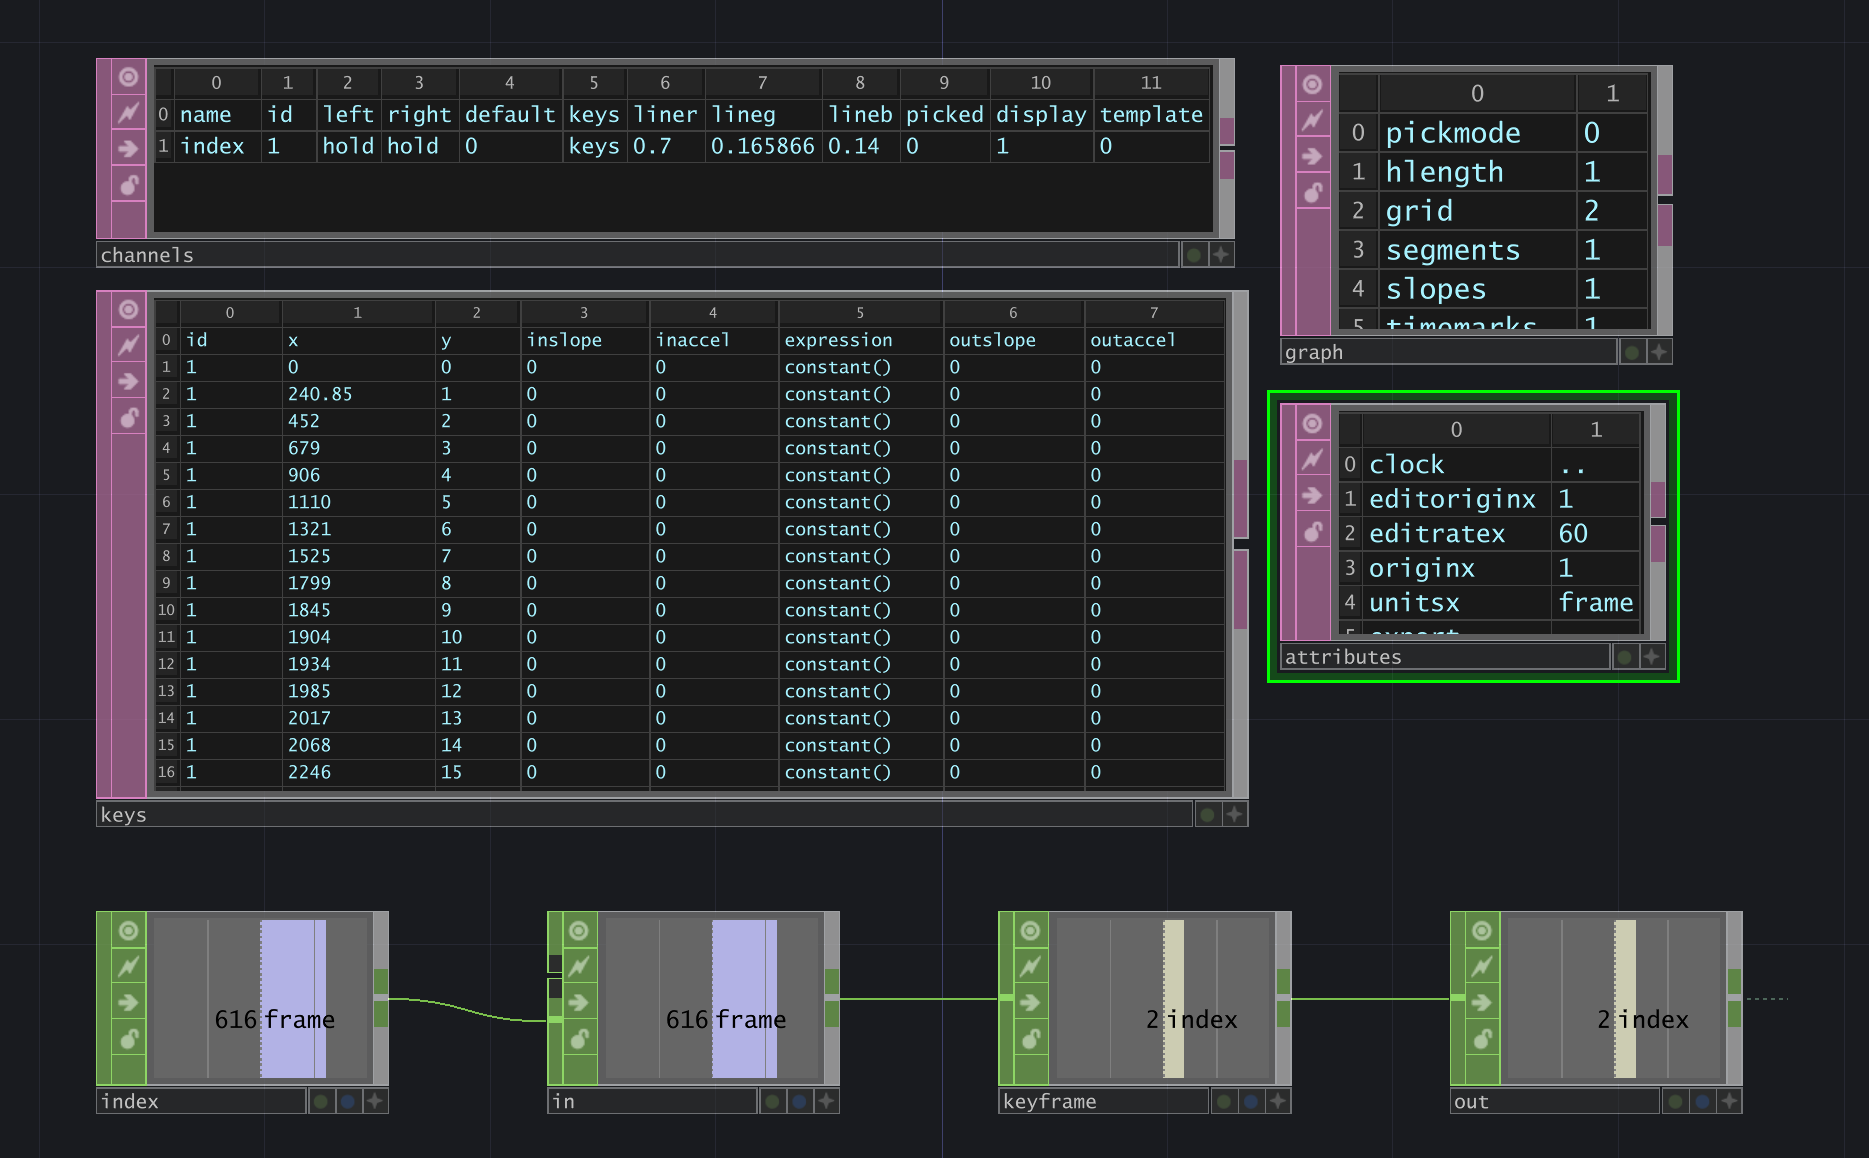
We can see a line of several CHOPs: timeline (named “index”)> in > keyframe > out. Above them are four table DATs: channels, keys, graph, and attributes. We care the most about channels and keys.
- “channels” table DAT: This table lists all the channels that exist in an animation COMP. In this example, we only have one channel called “index”, and it has several attributes: id, left, right, default, keys, liner, lineg, lineb, picked, display, template.
- id: an arbitrary value that starts at 1 and increments by 1.
- left & right: in the animation editor, you can pick how the channel should Extend Left and Extend Right. The options are: Hold, Slope, Cycle, Mirror, and Default Value.
- default: the value used when Extend Left/Right have Default Value selected.
- keys: the name of the table that is referenced for the keyframe values.
- liner, lineg, lineb: the RGB values that determine the color of the channel’s line in the animation editor.
- picked: denotes if the channel is currently selected in the animation editor.
- display: denotes whether the channel is being displayed.
- template: denotes if the channel is a template…this setting is turned on/off by selecting the pink box in the animation editor.
- “keys” table DAT: This table lists the keyframe information for every channel (unless the channel references a different table in its keys attribute). Let’s break down the columns:
- id: the id of the channel that is being row referenced.
- x: the x-value of the keyframe point.
- y: the y-value of the keyframe point.
- inslope, inaccel: the slope and acceleration of the line coming up to the keyframe point (I think?).
- expression: the function of the line between the current and the next keyframe point.
- outslope, outaccel: the slope and acceleration of the line leaving the keyframe point (again…I’m not 100% sure about these values).
For our animation example, the x value of the keyframe is the frame itself, and the y value is the index (used for selecting a row in the table).
These tables give us a lot of power. Now, we can reference them in a Python script to create/update/delete channels and keyframes.
Next, let’s explore how to parse different data structures and use them for keyframe data.
Parsing Transcripts for Animation Data
Method #1: Simple Animation with CSV Transcript Data
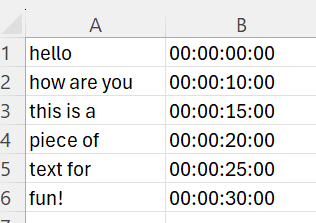
I started by testing this method using a basic transcript format in a CSV file: column 1 contained a string of text that I wanted to appear on the screen, and column 2 contained the timestamp that the word should appear.
My network consisted of a text DAT for the Python script, a table DAT which pulls in my transcript.csv file, then a select DAT, out DAT, animation COMP, and null CHOP formatted as previously described.
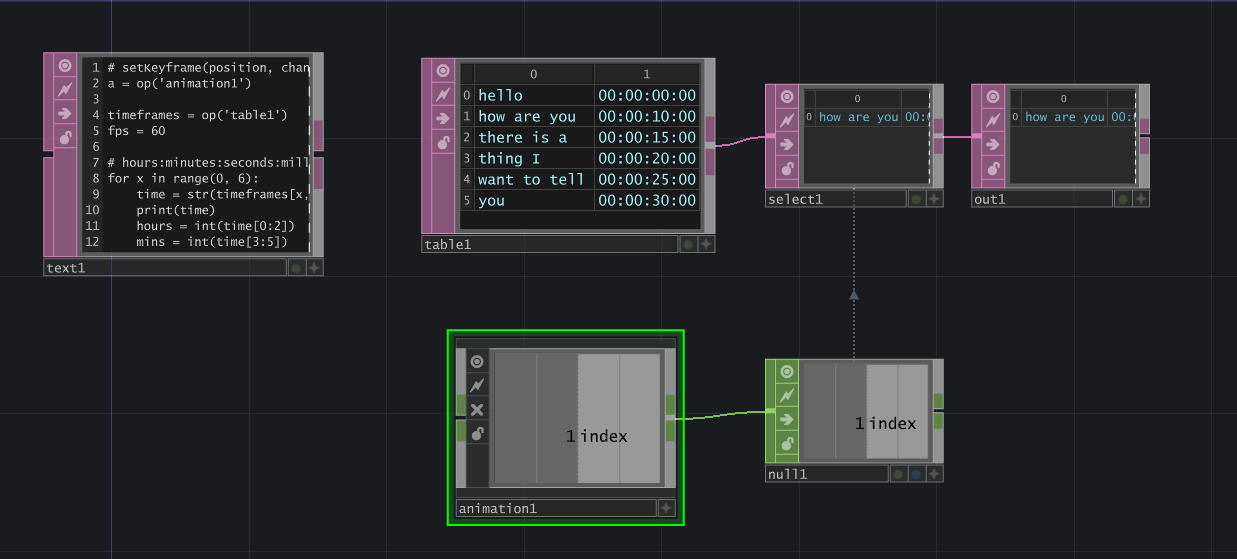
At the time of writing this Python script, I had not discovered the channels and keys tables which lived inside the animation COMP. The script assumes that the animation COMP has already been created, its name is “animation1”, and the index channel already exists.
1 2 3 4 5 6 7 8 9 10 11 12 13 14 15 16# setKeyframe(position, channel='index', value=None, function=None) a = op('animation1') timeframes = op('table1') fps = 60 # hours:minutes:seconds:milliseconds for x in range(0, timeframes.numRows): time = str(timeframes[x,1]) print(time) hours = int(time[0:2]) mins = int(time[3:5]) secs = int(time[6:8]) ms = int(time[9:]) total_seconds = (hours*3600) + (mins*60) + (secs) + (ms*0.001) frame = (total_seconds * fps)+1 a.setKeyframe(frame, channel='index', value=x, function=None)
This script goes through each row in the table, extracting & parsing each timestamp using string splicing, then calculates the frame based on the FPS of the project. An additional frame is added to each frame calculation so that the first frame is at 1 instead of 0 (there is no frame 0 in the TouchDesigner timeline).
Method #2: Simple Animation with AWS Transcribe’s JSON Data
My next test utilized output from AWS Transcribe, which I was testing to transcribe song lyrics. It generates output that looks like this:
1 2 3 4 5 6 7 8 9 10 11 12 13 14 15 16 17 18 19 20 21 22 23 24 25 26 27 28 29 30 31 32 33 34 35 36 37 38 39 40 41 42 43 44 45 46 47 48 49 50 51 52 53 54 55 56 57 58 59{ "jobName": "job1", "accountId": "585606228115", "status": "COMPLETED", "results": { "transcripts": [ { "transcript": "[FULL TRANSCRIPT HERE]" } ], "items": [ { "id": 0, "type": "pronunciation", "alternatives": [ { "confidence": "0.996", "content": "You" } ], "start_time": "21.78", "end_time": "22.989" }, { "id": 1, "type": "punctuation", "alternatives": [ { "confidence": "0.0", "content": "," } ] }, { "id": 2, "type": "pronunciation", "alternatives": [ { "confidence": "0.996", "content": "you" } ], "start_time": "23.579", "end_time": "23.819" }, { "id": 3, "type": "pronunciation", "alternatives": [ { "confidence": "0.991", "content": "can't" } ], "start_time": "23.819", "end_time": "24.18" }, … }
The transcript data also includes audio segments at the bottom. However, we only need the “items” array for this project. A notable difference with AWS Transcribe’s output is that the unit of time is seconds, represented as a floating-point value but stored as a string. Below is the Python script which extracts this data.
1 2 3 4 5 6 7 8 9 10 11 12 13 14 15 16 17 18 19 20 21 22 23 24 25 26 27 28 29 30 31 32import json a = op('animation1') # Reference to TouchDesigner animation operator table_dat = op('table1') # Reference to Table DAT for storing words and timestamps fps = 60 # Frames per second # Load AWS Transcribe JSON file aws_transcribe_path = './asrOutput.json' with open(aws_transcribe_path, 'r') as f: aws_data = json.load(f) # Clear existing data in table table_dat.clear() # Extract words and timestamps words = [] timestamps = [] for item in aws_data['results']['items']: if item['type'] == 'pronunciation': # Ensure it's a spoken word word = item['alternatives'][0]['content'] start_time = float(item['start_time']) words.append(word) timestamps.append(start_time) # Add to Table DAT table_dat.appendRow([word, str(start_time)]) # Convert timestamps to frame numbers and create keyframes for index, (word, start_time) in enumerate(zip(words, timestamps)): frame = int((start_time * fps) + 1) # Convert time to frame number a.setKeyframe(frame, channel='index', value=index, function=None)
Again, I wrote this code prior to finding the channels and keys tables in the animation COMP. Thus, it assumes an animation COMP exists with a channel named “index”. The network looked very similar to previous tests, although the time is formatted differently with this data.
Method #3: Python Scripting a Full Animation Network using Custom JSON Data
As part of a larger journey of testing transcription services (more on that in a future blog post), I experimented with different JSON data. The data can be incredibly simple – you technically only need two things: a word and its start time. Note: You may want an end time…if there are long pauses in someone speaking in a song/audio file, then a word should disappear (“end”) before making the next word appear.
For an ongoing project, I am utilizing both a “grouping” of words as well as each word’s individual start/end time. Each group also has an animation style and other options for the visual component, but those aren’t relevant here. Thus, the data structure of my preferred transcription method looks like this:
1 2 3 4 5 6 7 8 9 10 11 12 13 14 15 16 17 18 19 20 21 22 23 24 25 26 27 28 29 30 31 32 33 34 35 36 37 38 39[ { "group": "Attention is all you need.", "animation_style": "TBD", "options": [ "TBD" ], "start_time": 1.58, "end_time": 4.21, "words": [ { "word": "Attention", "start": 1.58, "end": 2.2800000000000002 }, { "word": "is", "start": 2.33, "end": 2.67 }, { "word": "all", "start": 2.7, "end": 3.1500000000000004 }, { "word": "you", "start": 3.2, "end": 3.5500000000000003 }, { "word": "need.", "start": 3.56, "end": 4.21 } ] }, … ]
This transcript is part of a larger project where I attempt to create an entire TouchDesigner network using a Python script. Here is an excerpt of that code which shows how to create animation components and keyframes using the transcript.
1 2 3 4 5 6 7 8 9 10 11 12 13 14 15 16 17 18 19 20 21 22 23 24 25 26 27 28 29 30 31 32 33 34 35# Script assumes it is running from within the target parent container. parent = me.parent() FPS = project.cookRate # FPS of the project LAST_FRAME = me.time.end # Last frame of the project # Set up the Animation COMP to drive the switch anim = parent.create(td.animationCOMP, "mainAnimation") # Configure the 'index' channel in the Animation COMP's channels DAT channels_dat = anim.op('channels') channels_dat.clear(keepFirstRow=True) channels_dat.appendRow( ['index', 1, 'hold', 'hold', 0, 'keys', 0.3, 0.14, 0.7, 0, 0, 0]) # Configure the Animation COMP’s keys DAT keys_dat = anim.op('keys') keys_dat.clear(keepFirstRow=True) # Append first row at Frame 1 keys_dat.appendRow([1, 1, 0, 0, 0, "constant()", 0, 0]) # Loop through groupings and add rows to keys DAT for i, item in enumerate(animation_data): start_frame = item["start_time"] * FPS keys_dat.appendRow([1, start_frame, i, 0, 0, "constant()", 0, 0]) # Append last row at last_frame keys_dat.appendRow([1, LAST_FRAME, 0, 0, 0, "constant()", 0, 0]) # Create a Null CHOP to hold the index channel value index_out = parent.create(td.nullCHOP, "main_index_out") index_out.viewer = True index_out.inputConnectors[0].connect(anim.outputConnectors[0])
In this script, I finally utilized the channels and keys DATs of the animation COMP to add my custom channel and keyframes. Using enumerate(animation_data) will go group-by-group through my JSON data, using the “start_time” value to calculate the frame (x-value), and the i from the enumeration as the index (y-value).
After setting up the animation COMPs index channel and keyframes, it can be used to control a select DAT as shown in the previous network examples, or it can control other elements, such as a switch TOP to move between different scenes.
Notes:
- When creating nodes in a Python script, they will generate at position (0,0) in the center of the network. To prevent all your nodes from stacking on top of each other, you can position them using the nodeX and nodeY properties (ex: anim.nodeX = 200). I prefer to space them about 200 units apart from each other. I’ve omitted these lines from my script above for brevity.
- All TouchDesigner operators have a setInputs() method, which takes an array of operators to set as inputs. However, using that method to connect the animation COMP to the index CHOP yielded an incompatible types error, so I used this line instead:
1index_out.inputConnectors[0].connect(anim.outputConnectors[0])
That’s All…For Now!
I am excited to continue developing this method as I progress through my TouchDesigner projects. If you’ve made it this far, thanks for reading! If you have any questions or discussion points, send me a message on the TouchDesigner forum at https://forum.derivative.ca/u/gbm2001/summary.