Video Fragmentation Effect in TouchDesigner
published Oct 8, 2025
//last updated Oct 9, 2025
TouchDesigner
Introduction
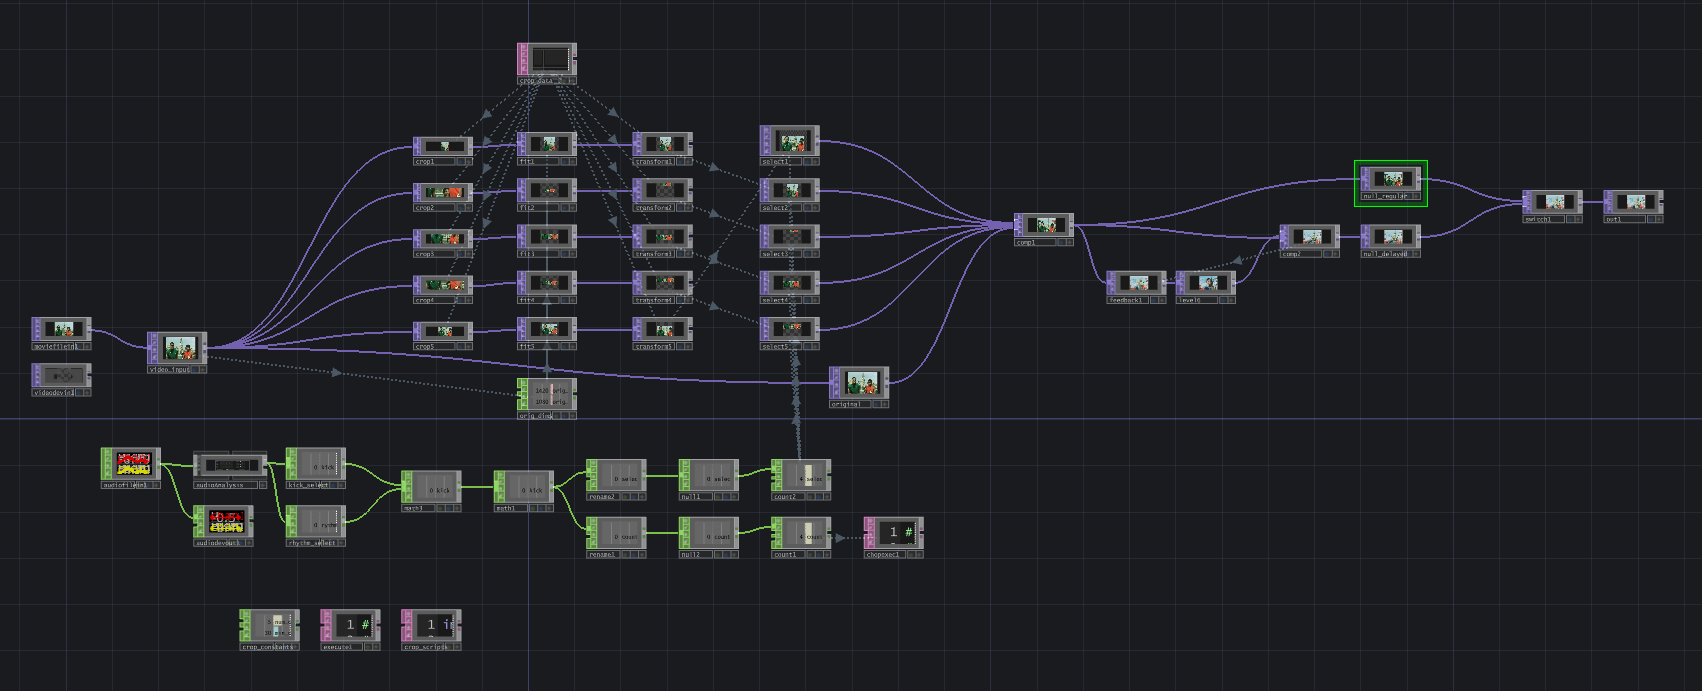
After playing around with some image cropping & layering effects in Python, I decided to implement it in two ways: as a web app (ImageFragmenter.app) and as a TouchDesigner effect. In this post, I’ll dive into how I recreated this effect using TouchDesigner operators (and a bit of Python too). Let’s break down the TouchDesigner network below.
Video Input and Crop Size Variables
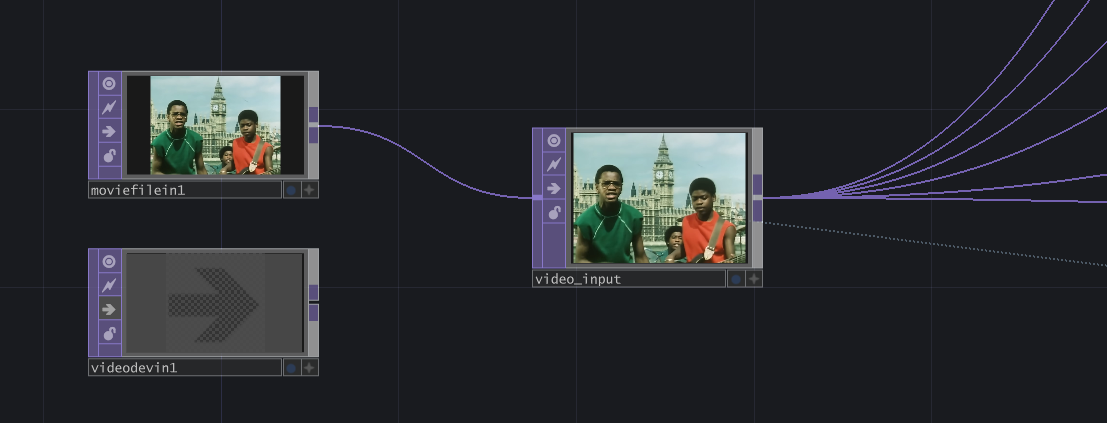
First and foremost, this project begins with video input. You can choose to upload a video file using the Moviefilein TOP or use live input from a camera with the Videodevicein TOP. From there, I connected a Null TOP and named it “video_input”.
Creating Crops
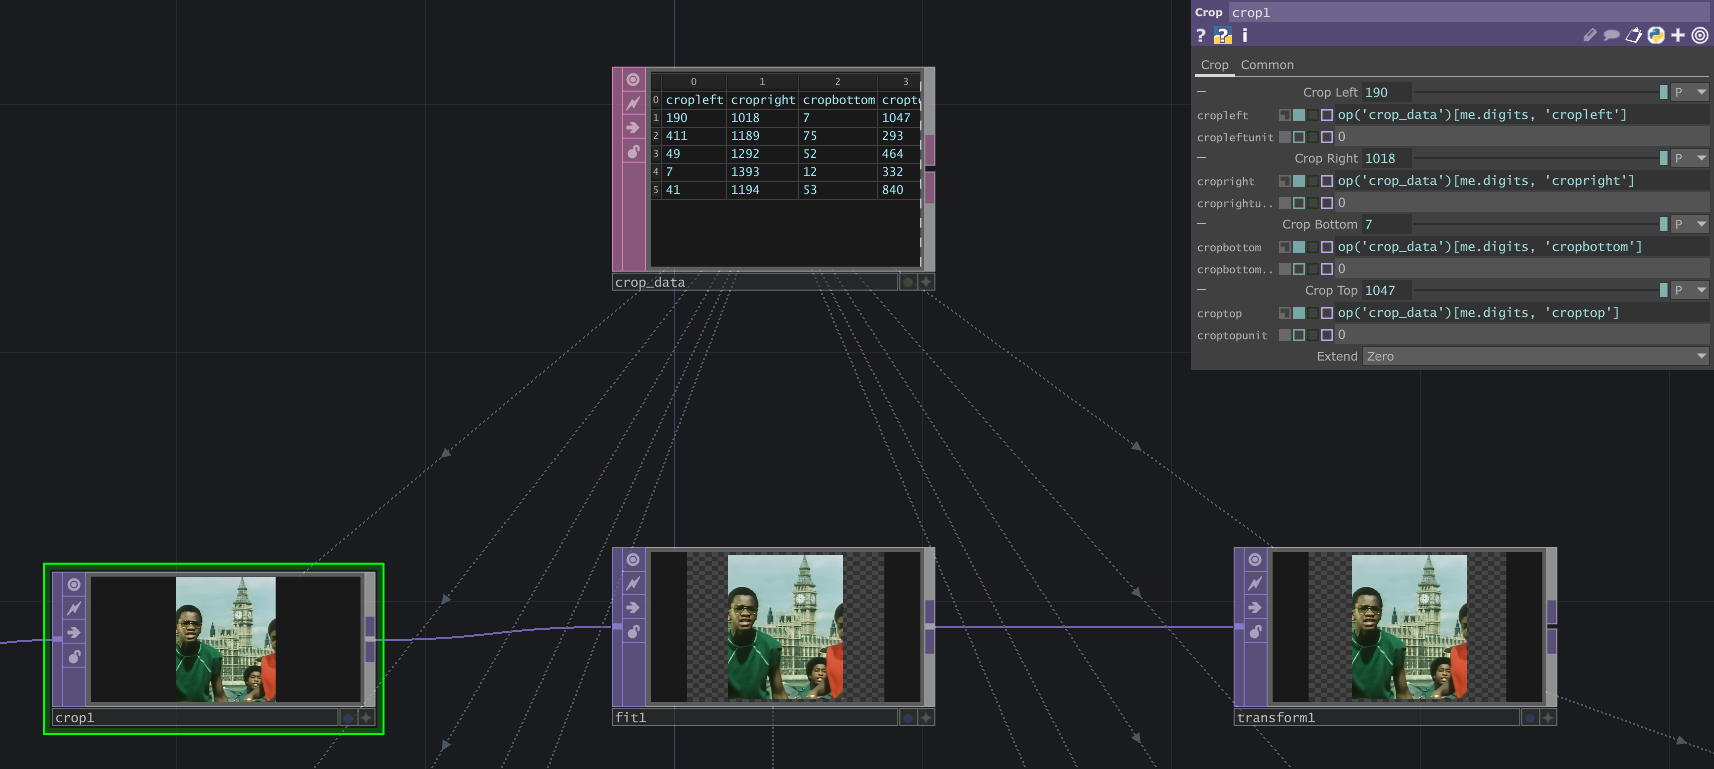
Next, I created five Crop TOPs, each taking the “video_input” TOP as input. The Crop TOP crops an image by defining the position of the left, right, bottom, and top edges of the image (https://docs.derivative.ca/Crop_TOP). To determine these parameters, the crops pull from a “crop_data” Table DAT.
The “crop_data” table is populated upon the initial start of the TouchDesigner project, then updated based on the audio file. This makes the crops audio-reactive. As shown below, some constants are defined in a Constant CHOP:
- num_crops = 5 (this value should correspond to the number of Crop TOPs, as it is used to determine the number of rows needed in the “crop_data” table)
- min_crop_size = 30 (this is the minimum number of pixels for the width and height of a crop)
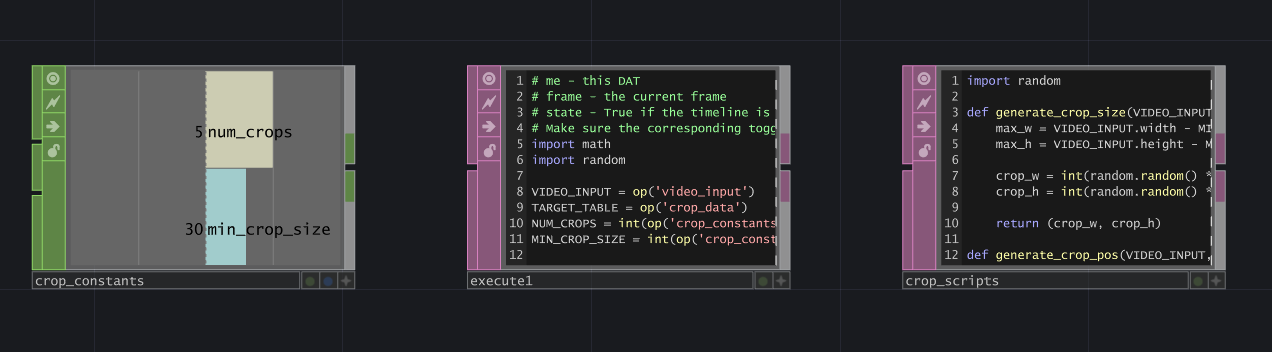
Also featured in the image above are an Execute DAT and “crop_scripts” Text DAT. I’ve utilized the onStart() function of the Execute DAT to initialize the “crop_data” table with starting crop sizes and positions:
1 2 3 4 5 6 7 8 9 10 11 12 13 14 15 16 17 18 19 20 21 22 23 24 25 26 27 28 29 30 31 32 33 34 35 36 37 38 39 40 41 42 43 44 45 46 47 48 49 50 51 52 53 54 55 56 57 58 59# me - this DAT # frame - the current frame # state - True if the timeline is paused # Make sure the corresponding toggle is enabled in the Execute DAT. import math import random VIDEO_INPUT = op('video_input') TARGET_TABLE = op('crop_data') NUM_CROPS = int(op('crop_constants')['num_crops']) MIN_CROP_SIZE = int(op('crop_constants')['min_crop_size']) # Prevents tiny crops def onStart(): # Prepare the table TARGET_TABLE.clear() TARGET_TABLE.appendRow(['cropleft', 'cropright', 'cropbottom', 'croptop', 'tx', 'ty']) # Header # Loop and calculate initial values for all crops for i in range(NUM_CROPS): # Generate random crop width crop_w, crop_h = mod('crop_scripts').generate_crop_size(VIDEO_INPUT, MIN_CROP_SIZE) # Calculate a unique random crop position random_x, random_y = mod('crop_scripts').generate_crop_pos(VIDEO_INPUT, crop_w, crop_h) # Calculate the final crop values left, right, bottom, top = mod('crop_scripts').generate_final_crop_vals(random_x, random_y, crop_w, crop_h) # Calculate random translate values tx, ty = mod('crop_scripts').generate_translate_vals(VIDEO_INPUT, crop_w, crop_h) # Append the results as a new row TARGET_TABLE.appendRow([left, right, bottom, top, tx, ty]) return def onCreate(): return def onExit(): return def onFrameStart(frame): return def onFrameEnd(frame): return def onPlayStateChange(state): return def onDeviceChange(): return def onProjectPreSave(): return def onProjectPostSave(): return
The “crop_scripts” Text DAT contains functions that do the actual work of determining the crop size, crop position (where it will be taken from the original video), and crop placement position (where it will be “pasted” back onto the original video). The content of "crop_scripts" is as follows:
1 2 3 4 5 6 7 8 9 10 11 12 13 14 15 16 17 18 19 20 21 22 23 24 25 26 27 28 29 30 31 32 33 34import random def generate_crop_size(VIDEO_INPUT, MIN_CROP_SIZE): max_w = VIDEO_INPUT.width - MIN_CROP_SIZE max_h = VIDEO_INPUT.height - MIN_CROP_SIZE crop_w = int(random.random() * max_w) + MIN_CROP_SIZE crop_h = int(random.random() * max_h) + MIN_CROP_SIZE return (crop_w, crop_h) def generate_crop_pos(VIDEO_INPUT, crop_w, crop_h): random_x = int(random.random() * (VIDEO_INPUT.width - crop_w)) random_y = int(random.random() * (VIDEO_INPUT.height - crop_h)) return(random_x, random_y) def generate_final_crop_vals(random_x, random_y, crop_w, crop_h): left = random_x right = random_x + crop_w bottom = random_y top = random_y + crop_h return (left, right, bottom, top) def generate_translate_vals(VIDEO_INPUT, crop_w, crop_h): max_tx = (VIDEO_INPUT.width - crop_w) / 2 max_ty = (VIDEO_INPUT.height - crop_h) / 2 # Generate a random position between -max and +max tx = (random.random() * 2 - 1) * max_tx ty = (random.random() * 2 - 1) * max_ty return (tx, ty)
- generate_crop_size: Using the video input size and minimum crop size, this function determines the maximum width and height of a cropped piece. Then it uses a random value between 0.0 and 1.0 to get a fraction of those maximum values. The random() method range is 0.0 <= x < 1.0. Since 0 is possible, I added the MIN_CROP_SIZE to the result of int(random.random() * max_[w, h]), in case it was 0.
- generate_crop_pos: Using the video input size and crop width & height, this function determines random x and y values from which to draw the crop. For each value, I subtract the crop_[w, h] from the VIDEO_INPUT.[width, height] to determine what space is left. Then it is multipled by a random floating point value between 0.0 and 1.0, and round the result down to an integer.
- generate_final_crop_vals: Using the (x, y) positions and crop width & height, this function determines the values used in the Crop TOP parameter. The bottom-left corner is where we start “drawing” the crop, so left = random_x and bottom = random_y. The right parameter is simply the left position + the size of the crop, so random_x + crop_w. The top parameter follows the same logic, so it’s random_y + crop_h.
- generate_translate_vals: Using the video input size and crop width & height, this function determines where to “paste” the crop back onto the original video. It calculates maximum translate x & translate y values by subtracting the crop size from the full video dimensions, then dividing by 2. The division by 2 is crucial because the origin (0, 0) translation point is in the center of the image (whereas in many cases, such as web development, (0, 0) is in the top-left). Finally, we can use these maximum values to get our translate x (tx) and translate y (ty) with (random.random() * 2 - 1) * max_[tx,ty].
- random.random() returns a float between [0.0, 1.0).
- Multiplying by 2 changes the range to [0.0, 2.0).
- Subtracting 1 changes the range to [-1.0, 1.0), which generates a scaling factor as such: -1.0 <= x < 1.0.
Audioreactivity
To make this project audioreactive, I utilized the audioAnalysis tool (Palette > Tools > audioAnalysis). For the specific song I used, the kick and rhythm matched the parts of the song on which I wanted the crops to change. Note: different songs will have different channels that are best-suited to trigger new crops. Play around with this tool and see what works best for your song!

As seen above, the kick and rhythm channels are added together (“math3” Math TOP > Combine CHOPs = Add) and the range is adjusted (“math1” Math TOP > From Range = 0 to 2, To Range = 0 to 1). From here, I used two Rename CHOPs to separate the channel for different uses. In “rename2”, I set the channel to “selectIndex” and put it into a Count CHOP with a Limit of Loop Min/Max from 1-5. This channel affects the Select TOPs, which I’ll describe in more detail below.
The other Rename CHOP, “rename1”, creates the “count” channel, which also goes into another Count CHOP with a Limit of Loop Min/Max from 1-5. This CHOP is also connected to a CHOP Execute DAT, where the onValueChange() function calls several methods from the “crop_scripts” DAT mentioned above. This takes the current count (1 through 5) and updates the “crop_data” table values of the corresponding row, which changes the size, position, and placement of a corresponding Crop TOP. The CHOP Execute DAT contents are below:
1 2 3 4 5 6 7 8 9 10 11 12 13 14 15 16 17 18 19 20 21 22 23 24 25 26 27 28 29 30 31 32 33 34 35 36 37 38 39 40 41 42 43 44 45 46 47 48 49 50 51 52 53 54 55 56# me - this DAT # channel - the Channel object which has changed # sampleIndex - the index of the changed sample # val - the numeric value of the changed sample # prev - the previous sample value # Make sure the corresponding toggle is enabled in the CHOP Execute DAT. import math import random VIDEO_INPUT = op('video_input') TARGET_TABLE = op('crop_data') NUM_CROPS = int(op('crop_constants')['num_crops']) MIN_CROP_SIZE = int(op('crop_constants')['min_crop_size']) # Prevents tiny crops def onOffToOn(channel, sampleIndex, val, prev): return def whileOn(channel, sampleIndex, val, prev): return def onOnToOff(channel, sampleIndex, val, prev): return def whileOff(channel, sampleIndex, val, prev): return def onValueChange(channel, sampleIndex, val, prev): current = int(val) # Ensure the count is within the valid range of our table rows if current < 1 or current > NUM_CROPS: return # Generate random crop width crop_w, crop_h = mod('crop_scripts').generate_crop_size(VIDEO_INPUT, MIN_CROP_SIZE) # Calculate a new random crop position random_x, random_y = mod('crop_scripts').generate_crop_pos(VIDEO_INPUT, crop_w, crop_h) # Calculate final crop values left, right, bottom, top = mod('crop_scripts').generate_final_crop_vals(random_x, random_y, crop_w, crop_h) # Calculate random translate values tx, ty = mod('crop_scripts').generate_translate_vals(VIDEO_INPUT, crop_w, crop_h) # Update the specific row in the table TARGET_TABLE[current, 'cropleft'] = left TARGET_TABLE[current, 'cropright'] = right TARGET_TABLE[current, 'cropbottom'] = bottom TARGET_TABLE[current, 'croptop'] = top TARGET_TABLE[current, 'tx'] = tx TARGET_TABLE[current, 'ty'] = ty return
Fitting & Positioning Crops
A feature of the Crop TOP is that the cropped part of the image is discarded, thus reducing the resolution of the image (https://docs.derivative.ca/Crop_TOP). To adjust the crops back to the original image’s resolution, I fed each one into a Fit TOP.
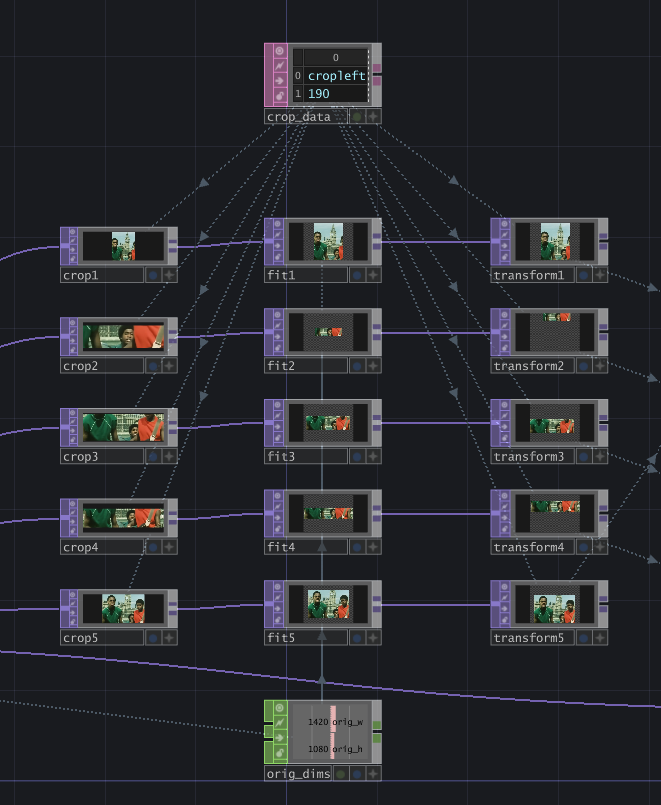
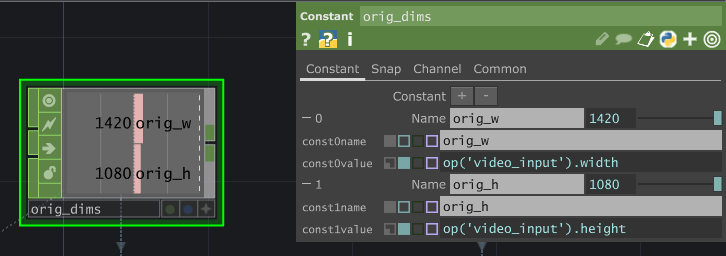
The Fit TOP’s “Fit” parameter is set to Native Resolution, then the Common > Resolution values are set using the original input’s width and height: resolutionw = op('orig_dims')['orig_w'], resolutionh = op('orig_dims')['orig_h']. I kept the dimensions in a separate Constant CHOP to keep the network clean.
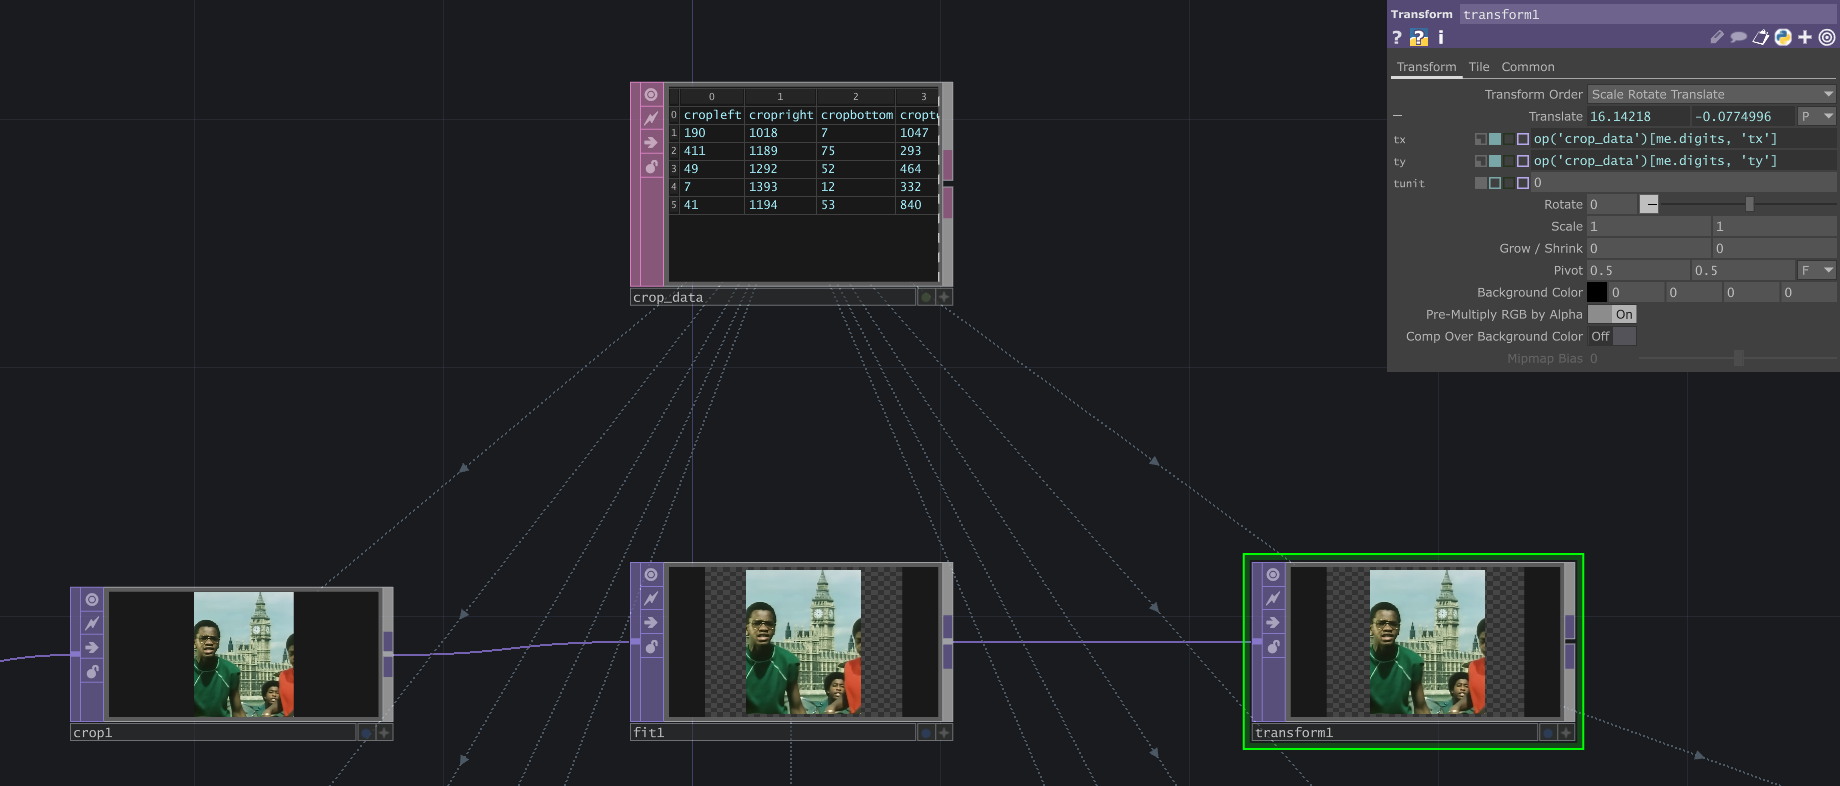
Now that the crop pieces have been “fitted” properly to the original dimensions, it’s time to position them based on the tx and ty values determined in the “crop_data” table.
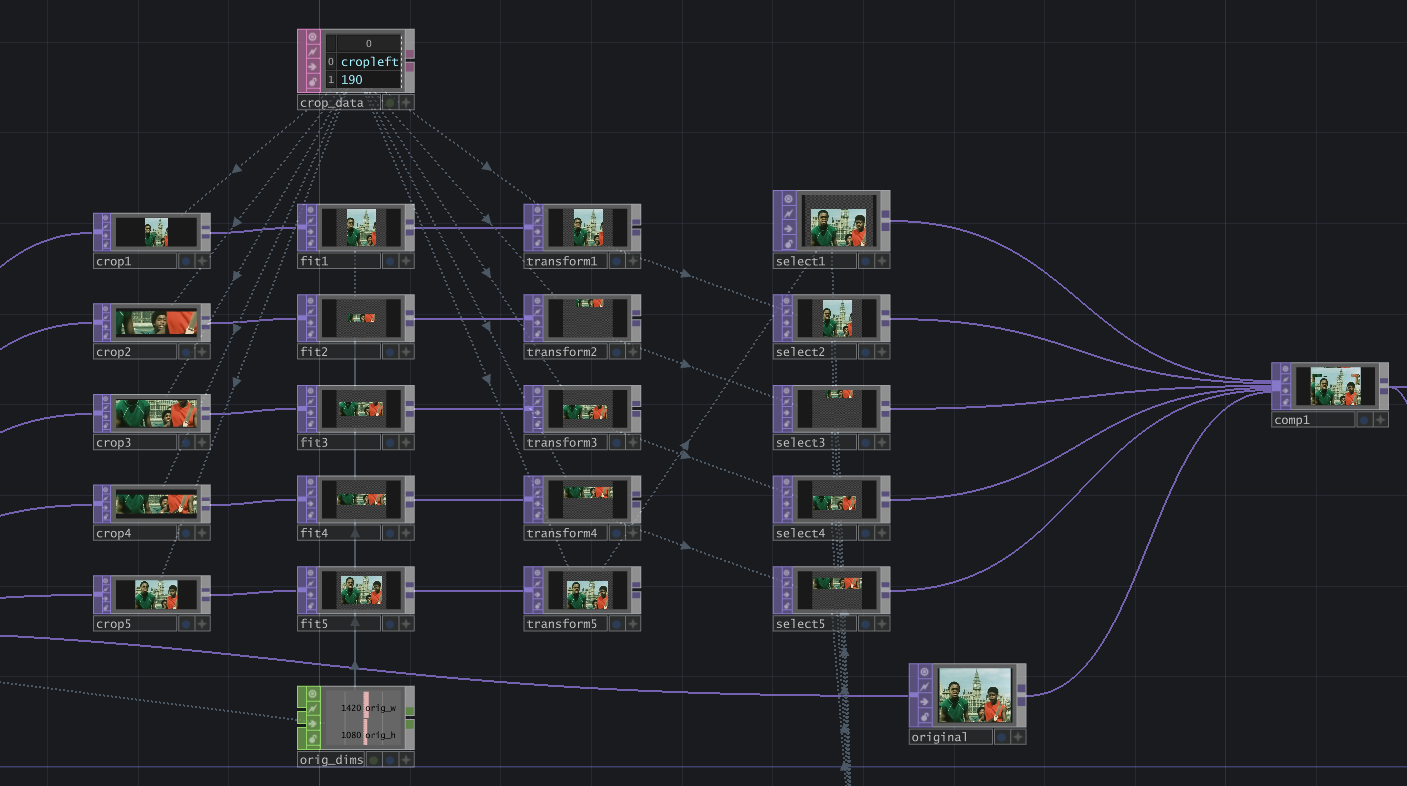
Layering & Reordering the Crops
To change the order of the cropped pieces, I utilized Select TOPs that feed into a Composite TOP (with the Operation set to Over). The Select TOP is very simple, with just one parameter to tell it which TOP to select. In this case, each Select TOP contains an expression:
- select1: op( 'transform' + str(int(op('count2')['selectIndex'])%5 + 1) )
- select2: op( 'transform' + str(int(op('count2')['selectIndex']+1)%5 + 1) )
- select3: op( 'transform' + str(int(op('count2')['selectIndex']+2)%5 + 1) )
- select4: op( 'transform' + str(int(op('count2')['selectIndex']+3)%5 + 1) )
- select5: op( 'transform' + str(int(op('count2')['selectIndex']+4)%5 + 1) )
These expressions dynamically construct the name of the Transform TOP that should be picked by the Select TOP (“transform[1-5]”). Let’s break down how this works on select5:
- op(‘count2’)[‘selectIndex’]: this value is either 1, 2, 3, 4, or 5.
- …+4: now the value is either 5, 6, 7, 8, or 9.
- …%5: modulo 5, so now the value is either 0, 1, 2, 3, or 4.
- …+1: now the value is either 1, 2, 3, 4, 5.
- op(‘transform’ + str(…)): string concatenation to select the Transform TOP of the resulting index.
This allows the select TOPs to cycle through the Transform TOPs, but each is offset by one.
Lastly, I also use a Null TOP named “original” to feed into the Composite TOP; this helps me know which one should always stay at the bottom of the list of inputs.
Feedback Loop for More Fun!
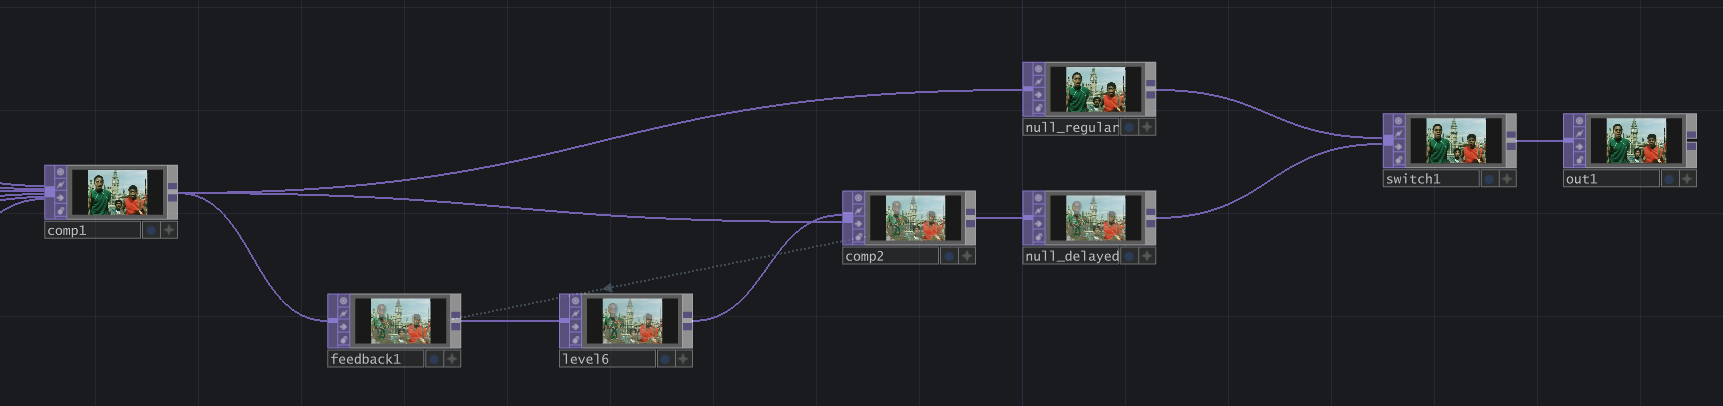
To add another visual effect, I fed the “comp1” Composite TOP into a Feedback TOP, then a Level TOP (Post > Opacity = 0.95), then the “comp2” Composite TOP (with the Operation set to Maximum). This creates a delayed visual effect where any motion in the video drags slightly. I attached each Composite TOP to a Null TOP, naming them “null_regular” and “null_delayed”, then fed them into a Switch TOP to easily switch between them.
Conclusion and Project File
This project uses a very simple concept of taking video fragments and layering them on top of the original video. It can be built upon using more complex feedback loops, or changing the rotation and size of the crops based on other factors (…more audioreactivity?).
VIEW THE PROJECT FILE HERE. Play around with it and leave a comment on that page to let me know what you think!
If you’ve made it this far, thanks so much for reading. For TouchDesigner-specific questions, you can message me on the forum (https://forum.derivative.ca/u/gbm2001/summary), or for general thoughts/questions feel free to email me at hello [@] graceis.online.